[Check Latest Arrivals bath tub repair kit on Amazon.]
# Bath Tub Repair Kit: Save Money and Fix Your Tub Like a Pro
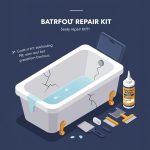
Nobody wants to stare at a chipped, cracked, or stained bathtub. It’s unsightly, and you might even think it’s time for a costly replacement. But hold on! Before you start budgeting for a brand-new tub, there’s a much simpler, faster, and cheaper solution: a bath tub repair kit.
This guide will show you how to save money and fix your tub like a pro using a bath tub repair kit. We’ll walk you through the process, step-by-step, so you can restore your tub to its former glory without breaking the bank. Let’s get started!
[Explore Top Rated bath tub repair kit on Amazon.]
## Step-by-Step Guide to Repairing Your Bathtub
Using a bath tub repair kit might seem daunting, but it’s actually a straightforward process. With the right kit and following the steps below, you can achieve professional-looking results.
### Step 1: Preparation is Key
Before you even open your bath tub repair kit, preparation is crucial. This will ensure the repair adheres properly and lasts longer.
1. **Clean the Damaged Area:** Use soap and water to thoroughly clean the chipped, cracked, or stained area. Avoid using abrasive cleaners that might further damage the surface. Rinse well and let it dry completely. This is absolutely essential for proper adhesion.
2. **Sand the Area (If Necessary):** If there are raised edges around the damage, lightly sand the area with fine-grit sandpaper. This will create a smooth surface for the repair material to adhere to. Be gentle and avoid removing too much material. After sanding, wipe away any dust with a clean cloth.
3. **Mask the Surrounding Area:** Use painter’s tape to mask off the area surrounding the damage. This will protect the surrounding surface from any accidental spills or smudges of the repair material. Make sure the tape adheres well to prevent any seepage.
### Step 2: Mixing the Repair Compound
Most bath tub repair kits come with a two-part epoxy or acrylic compound that needs to be mixed before application.
1. **Read the Instructions Carefully:** This is the most important step in the mixing process. Different kits may have different mixing ratios and instructions. Read the manufacturer’s instructions carefully and follow them precisely.
2. **Measure the Components:** Use the measuring cups or spoons provided in the kit to measure the correct amount of each component. Accuracy is crucial for the repair compound to cure properly.
3. **Mix Thoroughly:** In a small, disposable container (usually provided in the kit), thoroughly mix the two components together. Stir for the recommended amount of time, usually one to two minutes, until the mixture is uniform in color and consistency. Be sure to scrape the sides and bottom of the container to ensure all the components are fully incorporated.
### Step 3: Applying the Repair Compound
Now that the repair compound is mixed, it’s time to apply it to the damaged area.
1. **Apply a Thin Layer:** Using the applicator stick or brush provided in the kit, apply a thin, even layer of the repair compound to the damaged area. Avoid applying too much at once, as this can lead to drips and uneven curing.
2. **Fill the Damage:** Gradually build up the layers of the repair compound, filling in the chip, crack, or stain. Allow each layer to partially dry before applying the next. This will help prevent the compound from shrinking or cracking as it cures.
3. **Smooth the Surface:** Once the damage is filled, use the applicator stick or brush to smooth the surface of the repair compound, blending it seamlessly with the surrounding surface. If necessary, you can use a wet finger or a damp cloth to further smooth the surface.
### Step 4: Curing and Sanding
After applying the repair compound, it needs to cure properly. This is usually a waiting game.
1. **Allow Sufficient Curing Time:** Follow the manufacturer’s instructions for curing time. This is usually several hours or even overnight. Avoid touching or disturbing the repaired area during the curing process.
2. **Sand the Repaired Area:** Once the repair compound is fully cured, use fine-grit sandpaper to gently sand the repaired area. This will remove any imperfections and create a smooth, even surface. Start with a slightly coarser grit and gradually move to finer grits for a polished finish.
3. **Clean and Polish:** After sanding, clean the repaired area with a damp cloth to remove any dust. Then, use a polishing compound or a mild abrasive cleaner to polish the surface and restore its shine.
### Step 5: Final Touches
Now for the finishing details to make your bath tub repair kit repair look brand new.
1. **Remove the Masking Tape:** Carefully remove the masking tape from the surrounding area.
2. **Inspect the Repair:** Inspect the repaired area to ensure it’s smooth, even, and blends seamlessly with the surrounding surface. If necessary, you can apply another thin layer of polishing compound or touch-up paint to perfect the repair.
3. **Enjoy Your Repaired Tub!** Congratulations, you’ve successfully repaired your bathtub using a bath tub repair kit! Enjoy your newly restored tub without the expense of a full replacement.
[Explore Top Rated bath tub repair kit on Amazon.]
## Tools for the Job
A quality bath tub repair kit is essential, but certain features make the process much easier and the results more professional-looking. Here are two products you might want to consider:
* **MagicEzy Bath Tub RepairEzy:** This product features a unique nanotechnology formula that provides excellent adhesion and durability. Its pre-tinted colors make it easy to match your existing tub color, and its one-part application simplifies the repair process. The MagicEzy is great for repairing chips and cracks. Its key feature is its ease of use, even for beginners.
* **Porc-A-Fix Touch-Up Repair Kit:** If you have a porcelain tub, this kit is specifically designed for you. Its epoxy acrylic formula is ideal for repairing chips and scratches in porcelain surfaces. It comes in a variety of colors to match popular porcelain fixtures. The Porc-A-Fix kit’s key feature is its color-matching ability and its suitability for porcelain surfaces. Specifically, the Porc-A-Fix is a popular choice and allows you to easily touch-up and fix unsightly chips and scratches in porcelain bath tubs, sinks, and other items.
[Explore Top Rated bath tub repair kit on Amazon.]
## Pro-Tips / FAQ Section
Even with a detailed guide, you might still have questions or encounter some common issues. Here are a few pro-tips and frequently asked questions to help you achieve the best possible results:
* **What if the color doesn’t match perfectly?** Color matching can be tricky. If the color of the repair compound doesn’t match your tub exactly, you can try mixing different colors of repair compound together to create a custom match. You can also purchase a color-matching kit or consult with a paint specialist for expert advice.
* **How do I prevent air bubbles in the repair compound?** Air bubbles can sometimes form in the repair compound as it cures. To prevent this, try tapping the repaired area gently with your finger or a small object to release any trapped air. You can also use a toothpick to carefully remove any visible air bubbles.
* **How long will the repair last?** The longevity of the repair depends on several factors, including the quality of the repair kit, the preparation of the surface, and the amount of wear and tear the tub is subjected to. With proper application and care, a bath tub repair kit repair can last for several years.
* **Can I use a bath tub repair kit on other surfaces?** While bath tub repair kits are primarily designed for use on bathtubs, they can also be used to repair chips and cracks in other surfaces, such as sinks, toilets, and countertops. However, make sure the repair kit is compatible with the specific material you’re repairing.
* **What do I do if the repair compound cracks?** If the repair compound cracks after it cures, it may be due to improper mixing, insufficient curing time, or stress on the repaired area. In this case, you’ll need to remove the cracked repair compound and start the process again, making sure to follow the instructions carefully.
* **Ensure Proper Ventilation**: Work in a well-ventilated area to avoid inhaling any potentially harmful fumes from the repair kit. If ventilation is limited, consider wearing a respirator mask.
* **Don’t Rush**: Take your time and follow the instructions carefully. Rushing through the process can result in a subpar repair that may not last as long.
* **Clean the repaired area Regularly**: Regular cleaning will help prevent the buildup of dirt and grime, which can make the repair more noticeable.
[Explore Top Rated bath tub repair kit on Amazon.]
## Encouraging Conclusion
So there you have it! Repairing your bathtub with a bath tub repair kit is an achievable DIY project that can save you a significant amount of money. By following these steps and taking your time, you can restore your tub to its former glory and enjoy a sparkling clean bathroom without the hassle and expense of a full replacement. Don’t be intimidated – you’ve got this! With a little patience and the right bath tub repair kit, you’ll be amazed at the results you can achieve. Now, go ahead and give it a try, and say goodbye to that unsightly tub damage!
[Shop Budget-Friendly bath tub repair kit on Amazon.]